Most Shopify stores that fail on OpenAI Ads don’t fail because the channel doesn’t work. Instead, they fail because they skip a step in the setup, never notice, and then spend four weeks optimizing campaigns against broken data. One missing robots.txt rule blocks every ad. Meanwhile, a browser-only pixel hides a third of the sales. On top of that, a Conversions API key scoped to the wrong data source sends purchase events into a void. None of these throw an error — however, all of them waste your budget.
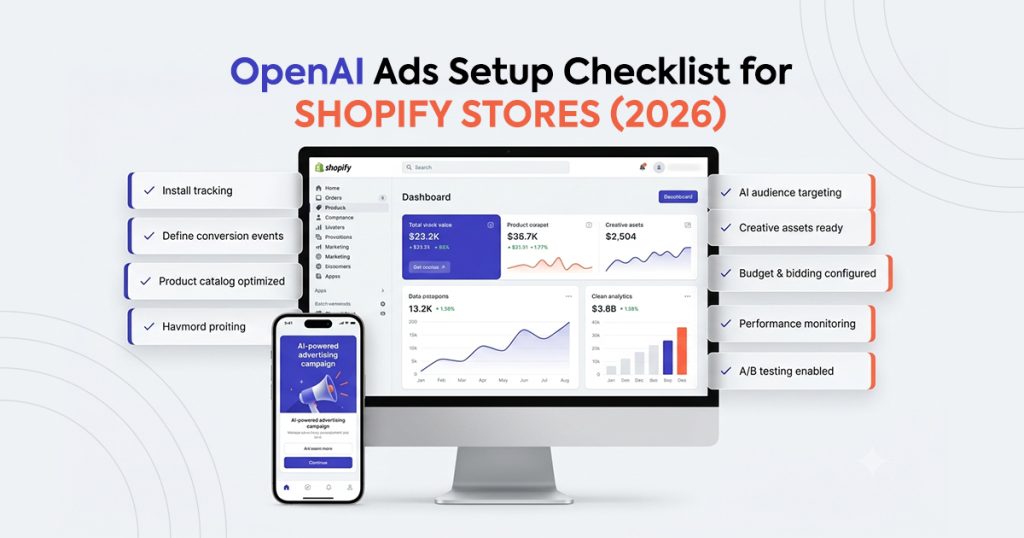
This is the complete OpenAI ads checklist — every technical, creative, and strategic step a Shopify store needs before spending its first dollar on ChatGPT Ads in 2026. Use it as a launch sequence and skip nothing, because the order matters.
Phase 1: Account and Access
Get the admin-level foundations in place before you touch anything technical.
1. Create your OpenAI Ads account
Go to ads.openai.com and complete business verification. As of mid-2026, the self-serve Ads Manager accepts all US businesses with no minimum spend. You need this account before any tracking setup, because the pixel sends events to a data source that lives inside this account.
2. Verify your business domain
OpenAI requires domain verification to confirm you own the store you’re advertising. Complete this early — otherwise, verification delays can stall your entire launch timeline by days.
3. Confirm your Shopify admin access
You need store-owner or admin-level access. Collaborator accounts sometimes lack the permissions for app installs and webhook configurations, so always check before you start.
Phase 2: Robots.txt and Crawler Access
This is the step most merchants miss entirely, and consequently it can silently disqualify every ad you run.
4. Allow OAI-AdsBot in your robots.txt
OpenAI’s ad crawler, OAI-AdsBot, inspects every landing page behind your ads. If your robots.txt blocks it, OpenAI can rule your product pages ineligible — and as a result, your ads won’t serve regardless of how perfect the rest of your setup is.
It’s important to note that OAI-AdsBot is a separate agent from GPTBot, OAI-SearchBot, and ChatGPT-User. You must therefore allow all four unless you have a specific reason not to.
5. Verify crawler access
After updating your robots.txt, test it immediately. Use a robots.txt validator and confirm that OAI-AdsBot can reach your homepage, product pages, and collection pages. Even a single misplaced Disallow rule can block your entire catalog.
Phase 3: Pixel and Conversions API Setup
This phase determines whether your campaigns optimize on real data or a partial guess. In other words, it’s the difference between a channel that scales and one you abandon at week four.
If you want the full technical explanation of why browser pixels lose a third of your conversions, we covered it in depth — but here’s the practical checklist.
6. Create a data source in OpenAI Ads Manager
Open the Data Sources (sometimes labelled Measurement or Pixels) section. Then create a new data source and name it clearly — yourbrand-shopify-prod, not test 2 final. This is where your pixel sends events.
7. Copy your Pixel ID
Your Pixel ID identifies the browser-side tag. You’ll sometimes see it called the OAIQ pixel, after the oaiq JavaScript object OpenAI’s snippet initializes. It’s the same thing, just a different name.
8. Generate your Conversions API key
This credential authorizes server-to-server event delivery. Treat it like a password — specifically, don’t paste it into a theme file, a Google Doc, or a Slack channel. You only need it once during setup, and after that it lives securely inside your tracking app.
9. Install server-side tracking (not just a browser pixel)
This is the single most important step on the entire checklist, and also the one most stores get wrong.
A browser-only pixel captures roughly 64% of your actual sales. Ad blockers, iOS Intelligent Tracking Prevention, Shop Pay redirects, and closed tabs silently eat the rest. When you feed that incomplete data to OpenAI’s algorithm, it targets the wrong buyers confidently — because it never sees the ones your pixel lost.
Server-side tracking, however, solves this problem entirely. Shopify’s order webhook fires the purchase event directly from Shopify’s servers to OpenAI’s Conversions API, so there’s no browser in the loop and nothing to block.
Count’s one-click server-side pixel handles this without theme edits, code, or a developer. Simply paste your Pixel ID and API key, then save — and you’re done. As a result, the measured match rate hits 99.4% against actual Shopify orders.
Phase 3b: Validation and Deduplication
Before you launch any campaign, you need to confirm that every event fires correctly and that no sale counts twice.
10. Verify event deduplication
If you run both a browser pixel and server-side delivery (and you should, because the browser catches mid-funnel events the server can’t), both tracks can report the same purchase. Without a shared event_id, that sale counts twice, and consequently your ROAS inflates by 60–70%.
Count handles deduplication automatically by Shopify order ID — so each sale reports exactly once. If you build this yourself, however, matching the event_id across both tracks is the step you absolutely cannot skip.
11. Validate with a test order
Never launch a campaign on faith. Instead, place a real test order (use Shopify’s Bogus Gateway or a low-value purchase you refund) and then verify three things.
First, check that the purchase appears in your tracking app’s event log — with the correct value, exactly once, marked server-side. Next, confirm the event shows in your OpenAI Ads data source within about a minute. Finally, verify that the value matches the order total after discounts, in your store’s currency.
What do the common failures mean? A browser-only event means your API key didn’t connect. A zero value usually points to a Shopify Markets misconfiguration. And a duplicated event means a second pixel sits in your theme that you need to remove.
12. Set up event types
Configure which events to send: page view, view content, add to cart, initiate checkout, and purchase. Generally, the defaults work for most stores. Turn off what you don’t need, though — because the algorithm optimizes better on a clean subset than on a noisy superset.
Phase 4: Product Catalog and Landing Pages
ChatGPT surfaces products by context, not keyword. As a result, your catalog needs to speak the language of a conversation rather than a search bar.
13. Rewrite product titles conversationally
“Merino Crew — Charcoal” tells the algorithm nothing. In contrast, “Lightweight merino base layer for cold-weather hiking, odor-resistant” tells it everything. Think about how a customer would ask ChatGPT to find your product, rather than how they’d search Google.
14. Expand product descriptions with benefit language
Move beyond specs. Specifically, answer the questions a shopper would ask in a conversation: Who is this for? What problem does it solve? When would someone use it instead of the alternative? The richer your descriptions become, the better OpenAI’s contextual matching works.
15. Audit product images
ChatGPT ads can surface product imagery, so make sure every product has at least one clean, high-resolution lifestyle image and also one on-white shot. Low-quality or missing images reduce click-through rates regardless of how good your copy is.
16. Optimize landing-page load speed
A shopper who clicks a ChatGPT ad expects the same instant experience they get inside the chat. A slow landing page, therefore, breaks that continuity. Run your top product pages through PageSpeed Insights and then fix anything that pushes load time above two seconds on mobile.
Phase 5: Campaign Structure and Budget
17. Start with a single-campaign structure
Resist the urge to port your Meta or Google structure over. OpenAI’s auction is still thin, and as a result the algorithm needs concentrated data to learn. Start with one campaign, one ad set, and three to five ad variations. Only split after you accumulate enough conversion volume for the algorithm to optimize each segment independently.
18. Set a controlled daily budget
Begin conservative — enough to generate learnings, but not so much that an unoptimized campaign burns through cash. During weeks one through three, the goal is data rather than scale. Scale, in turn, comes only after you validate what works.
19. Choose value-based bidding (if available)
If OpenAI’s Ads Manager offers value-based or ROAS-target bidding at launch, use it — but only if your tracking sends exact order values. Approximate values, after all, teach the algorithm to optimize toward approximate revenue. This is precisely where Count’s exact order-value reporting directly impacts your bid strategy.
Phase 6: Creative and Copy
OpenAI Ads run inside a conversational interface. Because of this, what wins on a visual platform like Instagram will almost certainly fall flat in a text-heavy chat context.
20. Write ad copy that feels like a helpful answer
Your ad appears mid-conversation, alongside ChatGPT’s response. Copy that reads like a sales pitch breaks the flow. However, copy that reads like a recommendation from a knowledgeable friend fits naturally. In short, be useful first and persuasive second.
21. Match copy to conversational intent
Think about what the shopper just asked ChatGPT. For example, “best sustainable activewear for HIIT” calls for a different tone and angle than “lightweight backpack for multi-day hiking.” Build ad variations around the most common conversational entry points for your products accordingly.
22. Test three to five variations from day one
Don’t launch with a single ad. The auction rewards relevance, and relevance varies by conversational context. Instead, test different angles — problem-solution, benefit-led, social-proof, comparison — and then let performance data tell you which resonates most.
23. Skip the hard sell
Drop the “BUY NOW!!!” headlines, the “LIMITED TIME OFFER” banners, and the countdown timers from your copy entirely. The ChatGPT audience expects informational, conversational content, so aggressive sales language tanks your relevance score and consequently costs you more per click.
Phase 7: Geo-Targeting and Audience
24. Target the right geographies
As of mid-2026, ChatGPT ads serve to Free and Go tier users in the US, Canada, Australia, and New Zealand. Plus, Pro, and Enterprise subscribers, by contrast, don’t see ads. Therefore, make sure your geo-targeting matches these available markets and also that your store ships to them.
25. Align currency and shipping
If you target Canada and Australia, confirm your Shopify Markets settings handle multi-currency checkout and that your shipping zones cover those regions. Otherwise, a great ad that leads to a “we don’t ship here” message wastes every dollar behind the click.
26. Assess your audience fit
The free-tier ChatGPT user base skews tech-savvy, research-oriented, and comparison-driven. If your product sells well to a digitally native, information-seeking buyer, then the fit is strong. However, if your core demographic rarely uses AI tools, adjust expectations accordingly.
Phase 8: Measurement and Iteration Framework
27. Define your success metrics before launch
Decide on your target ROAS, acceptable CPA, and minimum conversion volume before the first ad runs. Without pre-set benchmarks, you’ll evaluate performance on gut feeling — and gut feeling, unfortunately, doesn’t survive noisy early data.
28. Compare platform data against Shopify weekly
Run the same check every Monday: ad platform conversion count versus Shopify order count for the same window. A ratio near 1.0 means your tracking works. Anything significantly above 1.0, on the other hand, signals double-counting. Similarly, anything significantly below means your pixel still misses sales. We covered this 60-second audit in the deduplication guide.
29. Schedule creative refreshes
Conversational ad creative fatigues differently from visual ads, but it still fatigues over time. Therefore, plan a new round of ad variations every two to three weeks, informed by which angles and CTAs drove the highest click-through and conversion rates during the previous cycle.
30. Watch the event log, not just the dashboard
Dashboards aggregate — but event logs, in contrast, show you individual events in real time. You see each page view, each add-to-cart, and each purchase, along with its delivery source and its value. Watching the log during the first week consequently catches value errors, missing events, and deduplication failures that aggregated metrics typically hide for weeks. Count’s real-time event log gives you this visibility from day one.
Quick-Reference Checklist: Steps 1–15
Copy this, print it, and tape it next to your monitor.
| # | Step | Done |
|---|---|---|
| 1 | Create OpenAI Ads account at ads.openai.com | ☐ |
| 2 | Verify business domain | ☐ |
| 3 | Confirm Shopify admin access | ☐ |
| 4 | Allow OAI-AdsBot in robots.txt | ☐ |
| 5 | Validate crawler access with robots.txt tester | ☐ |
| 6 | Create data source in Ads Manager | ☐ |
| 7 | Copy Pixel ID | ☐ |
| 8 | Generate Conversions API key | ☐ |
| 9 | Install server-side tracking (Count or equivalent) | ☐ |
| 10 | Verify event deduplication | ☐ |
| 11 | Place and validate test order | ☐ |
| 12 | Configure event types | ☐ |
| 13 | Rewrite product titles conversationally | ☐ |
| 14 | Expand descriptions with benefit language | ☐ |
| 15 | Audit product images | ☐ |
Quick-Reference Checklist: Steps 16–30
| # | Step | Done |
|---|---|---|
| 16 | Check landing-page load speed | ☐ |
| 17 | Set up single-campaign structure | ☐ |
| 18 | Set controlled daily budget | ☐ |
| 19 | Choose value-based bidding (if available) | ☐ |
| 20 | Write conversational ad copy | ☐ |
| 21 | Match copy to conversational intent | ☐ |
| 22 | Launch with 3–5 ad variations | ☐ |
| 23 | Remove hard-sell language | ☐ |
| 24 | Set geo-targeting (US, CA, AU, NZ) | ☐ |
| 25 | Align currency and shipping settings | ☐ |
| 26 | Assess audience fit | ☐ |
| 27 | Define success metrics pre-launch | ☐ |
| 28 | Schedule weekly platform-vs-Shopify audit | ☐ |
| 29 | Plan creative refresh cadence | ☐ |
| 30 | Monitor event log for first week | ☐ |
Don’t Want to Run the Checklist Yourself?
If 30 steps feels like 30 too many, then two options exist.
Self-serve, automated tracking: Install Count on Shopify and it handles steps 6 through 12 automatically — pixel, CAPI, deduplication, validation, and event types — all in under two minutes. The free plan covers the full server-side pixel, so no paywall hides accuracy.
Fully managed launch: Alternatively, the team behind Count also runs the entire checklist for you — tracking, catalog, creative, campaign build, and ongoing optimization. Count’s managed OpenAI Ads service starts with a free readiness audit that measures your actual conversion gap before you commit a dollar of ad spend.
Frequently Asked Questions
Q1: What is the minimum I need to launch OpenAI Ads on Shopify?
You need an OpenAI Ads account (business-verified), a Shopify store with admin access, server-side conversion tracking with the Conversions API, and OAI-AdsBot allowed in your robots.txt. If you skip any of these four, your campaigns either won’t serve, won’t track, or won’t optimize properly.
Q2: Do I need a separate OpenAI ads checklist for each Shopify store?
Yes. Each store needs its own data source, Pixel ID, Conversions API key, robots.txt verification, and tracking validation. Never share credentials across stores, because the algorithm optimizes per data source — and as a result, mixing signals from two stores corrupts both.
Q3: What does OAI-AdsBot do, and why does blocking it kill my ads?
OAI-AdsBot crawls the landing pages behind your ads to verify content quality and policy compliance. If your robots.txt blocks it, OpenAI can’t inspect your pages and may consequently rule them ineligible. Your ads then either won’t serve at all or will lose relevance scoring, which in turn raises your costs and lowers your reach.
Q4: Can I use a browser pixel without server-side tracking?
Technically you can, but as a result you’ll lose roughly a third of your conversions to ad blockers, iOS ITP, and checkout redirects. The algorithm then optimizes on a biased 64% of your buyers, systematically avoiding your highest-value segments. Server-side tracking through the Conversions API closes that gap — and it’s therefore the single highest-impact item on this checklist.
Q5: How much budget do I need to start?
OpenAI removed its minimum-spend requirements when the self-serve Ads Manager launched in May 2026. Start with whatever daily budget lets you run for at least two to three weeks while accumulating enough conversion data for the algorithm to learn. In general, conservative is better than aggressive during the learning phase — because at this stage you’re buying data, not scale.
Q6: Which countries can I target with ChatGPT ads?
As of mid-2026, ads serve to Free and Go tier users in the US, Canada, Australia, and New Zealand. ChatGPT Plus, Pro, and Enterprise subscribers, however, remain ad-free. So before you activate geo-targeting, make sure your Shopify store ships to these markets and also handles their currencies.
Q7: How do I know if my setup actually works before I spend money?
Place a test order and then check three places. First, look at your tracking app’s event log — the purchase should appear with the correct value, exactly once, marked server-side. Second, open your OpenAI Ads data source and confirm the event lands within a minute. Third, check your robots.txt to verify OAI-AdsBot isn’t blocked. Never launch on faith, because you can’t retroactively attribute conversions from a campaign that ran on broken tracking.