If you have already read our early-mover guide to OpenAI Ads, you know the thesis: the auction is still thin, the intent is unusually high, and the brands that plant a flag now will spend the next two years compounding an advantage their competitors have to buy back at 3x the CPC. But there is a prerequisite that quietly decides whether any of that theory turns into revenue — your pixel.
The OpenAI Ads algorithm is a machine learning system, and machine learning systems are downstream of the data you feed them. Feed it 64% of your purchases and it will confidently optimize toward the wrong 64%. Feed it every sale, at the right value, exactly once, and it will find buyers you did not know existed. That difference is not a strategy problem. It is a fifteen-minute installation problem.
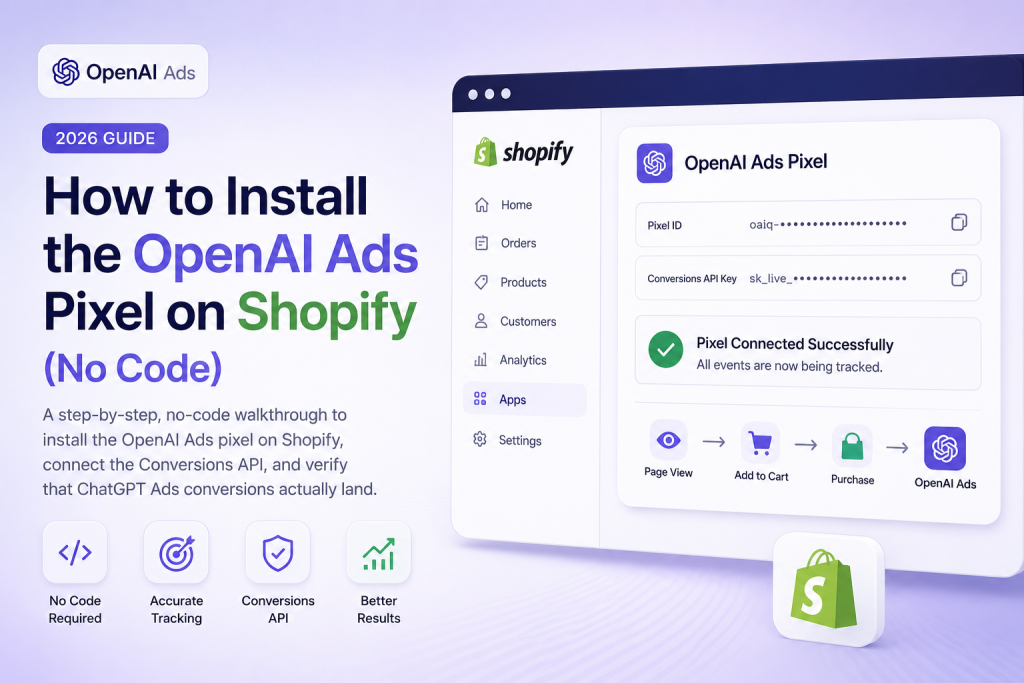
This is the literal walkthrough: App Store install, pixel connection, Pixel ID and Conversions API key, and validation — no theme edits, no Liquid, no developer, no code. We will also cover which apps on the Shopify App Store actually do this, and where each one fits.
Before You Start: What You Actually Need
Three things, and only three:
- An OpenAI Ads account. The pixel sends events to a data source that lives inside your OpenAI Ads account, so the account has to exist first. Head to ads.openai.com and complete business verification. As of mid-2026 the self-serve Ads Manager is open to US businesses, with ads served to Free and Go tier users in the US, Canada, Australia, and New Zealand.
- A Shopify store you’re an admin on. Any plan. You do not need Shopify Plus for a proper server-side setup — that is precisely the point of doing it through an app pixel and webhooks instead of checkout scripts.
- Fifteen minutes. Realistically less. Most of it is waiting for a test order to land.
One thing to check before anything else: your robots.txt. OpenAI’s ad crawler, OAI-AdsBot, inspects the landing pages behind your ads, and it is a separate agent from GPTBot, OAI-SearchBot, and ChatGPT-User. Block it and your product pages can be ruled ineligible before your pixel ever fires a single event. Allow all four unless you have a specific reason not to.
Step 1: Get Your Pixel ID and Conversions API Key
Everything downstream depends on two values. Both live in the same place.
- Log in at ads.openai.com.
- Open the Data Sources (sometimes labeled Measurement or Pixels) section of Ads Manager.
- Create a new data source for your store if one doesn’t exist. Name it something you’ll recognize in six months — yourbrand-shopify-prod, not test 2 final.
- Copy the Pixel ID. This is the identifier the browser-side tag uses. You’ll sometimes see it referenced as the OAIQ pixel, after the oaiq JavaScript object OpenAI’s snippet initializes. Same thing, different name.
- Generate and copy the Conversions API key. This is the credential that authorizes server-to-server event delivery. Treat it like a password — it does not belong in your theme, in a Google Doc, or in a Slack channel.
Paste both somewhere safe for the next ninety seconds. You will not need them again after that.
A note on OpenAI’s official snippet. The manual install path OpenAI documents has been reported to fire a spurious registration event on page load, which quietly corrupts conversion tracking for advertisers who copy-paste it into their theme. This is one of several reasons the no-code app route is not just the easier option — it is the more accurate one.
Step 2: Install the App (No Theme Edits)
This is the part that used to require a developer and no longer does.
- Go to the Shopify App Store and install Count — OpenAI Ads Pixel.
- Approve the permission scopes. Count needs read access to orders and checkouts — that is what makes server-side confirmation possible, since the purchase event is generated from Shopify’s own order webhook rather than from a script in the shopper’s browser.
- That’s the install. There is no step where you touch your theme. No theme.liquid, no additional scripts, no checkout customization, no Additional Scripts box (which, on non-Plus plans, you don’t have access to anyway).
Count uses Shopify’s native Web Pixels API for browser-side events and Shopify’s webhook APIs for server-side confirmation. Both are first-class Shopify surfaces, which means your setup survives theme updates, theme swaps, and checkout extensibility migrations without breaking. A snippet pasted into a theme file survives none of those.
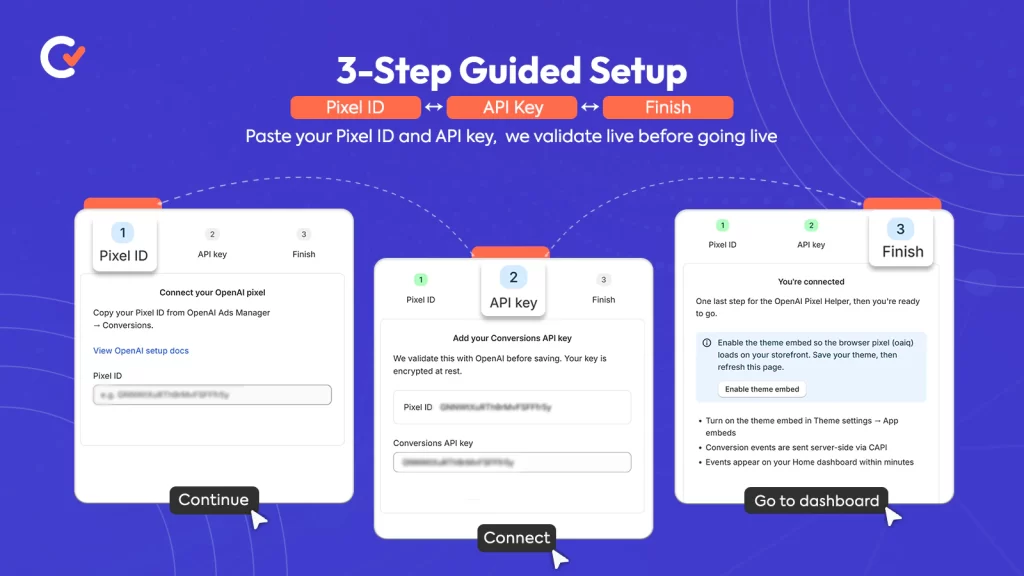
Step 3: Connect Your Pixel ID and API Key
Open Count from your Shopify admin. You’ll land on a guided setup screen.
- Paste your Pixel ID into the first field.
- Paste your Conversions API key into the second.
- Click Save.
Count validates the credentials against OpenAI immediately — you’ll get a confirmation state, not a silent failure that you discover three weeks and $4,000 later. If the key is wrong, malformed, or scoped to a different data source, you’ll know in seconds.
- Choose your event types. The defaults are correct for most stores: page view, view content, add to cart, initiate checkout, purchase. Turn off what you don’t need; the algorithm optimizes fine on a clean subset and less fine on a noisy superset.
That’s the configuration. Total elapsed time: under two minutes.
Step 4: Understand What’s Actually Happening (30 Seconds, Worth It)
Skip this if you like, but the merchants who understand this section are the ones who debug their own problems.
Count fires events on two tracks simultaneously:
- Browser track. The web pixel fires page views, product views, and add-to-carts from the shopper’s browser. Fast, rich, and — for roughly a third of your traffic — completely blocked by ad blockers and iOS privacy features.
- Server track. When Shopify records the order, the order webhook sends the purchase to OpenAI’s Conversions API directly from Shopify’s servers. No browser involved. Nothing to block.
The purchase is the event your bidding and your reporting both depend on, and it is also the event most likely to be lost browser-side — to an ad blocker, to iOS Intelligent Tracking Prevention, to Shop Pay’s redirect, or to a buyer who closes the tab before the thank-you page renders.
Both tracks send the same event_id, derived from the Shopify order ID, which is unique and stable. That shared ID is what lets OpenAI deduplicate. Without it, every sale is counted twice and your reported ROAS becomes a number that describes nothing.
This is the single most common self-inflicted wound on this channel. A merchant installs OpenAI’s snippet manually and wires up a CAPI call, both fire, neither shares an event_id, and the store spends a month scaling campaigns against a 2x-inflated conversion count. Count handles deduplication by order ID automatically. If you build it yourself, this is the part you must not get wrong.
Step 5: Validate Before You Spend a Dollar
Do not launch a campaign on faith. Validate.
In Count: Open the real-time event log. Then, in a separate browser (or an incognito window):
- Visit a product page → a page_view and view_content should appear within seconds.
- Add the product to cart → an add_to_cart should appear.
- Place a real test order using Shopify’s Bogus Gateway or a genuine low-value purchase you refund afterward → a purchase should appear, with the correct order value and currency.
Check three things on that purchase event specifically:
- Value matches the order total (post-discount, in your store’s currency).
- It appears exactly once. Not twice.
- It arrived server-side. Count marks delivery source; a purchase that only shows browser-side means your API key didn’t take.
In OpenAI Ads Manager: Open your data source. Events should show as receiving within roughly a minute of the order. If Count shows the event and OpenAI doesn’t, the credential or the data source mapping is wrong — not the install.
Common failure states and what they mean:
| Symptom | Likely cause | Fix |
| No events at all | Pixel ID pasted with trailing whitespace, or app not activated | Re-paste, save, retest |
| Browser events fire, purchases don’t | Conversions API key invalid or scoped to another data source | Regenerate the key in Ads Manager |
| Purchases counted twice | A second pixel installed manually in your theme | Remove the theme snippet; keep the app |
| Values wrong / zero | Multi-currency or a subscription app intercepting the order | Check Shopify Markets settings, contact support |
| Ads disapproved, pixel fine | OAI-AdsBot blocked in robots.txt | Allow the crawler |
Which Apps Install the OpenAI Ads Pixel on Shopify?
The App Store filled up fast after the May 2026 Ads Manager launch, and the listings all say roughly the same words: one-click, no code, server-side, CAPI. They are not all doing the same thing. Here’s the honest landscape.
Count — OpenAI Ads Pixel
What it is: A purpose-built OpenAI Ads pixel app for Shopify. One-click install via Shopify’s native app pixel, guided Pixel ID + API key setup, server-side CAPI delivery confirmed by Shopify webhooks, event deduplication by order ID, exact order values including discounts and refunds, consent-aware via Shopify’s Customer Privacy API, and a live event log for verification.
Where it fits: Stores that want the channel done properly and don’t want to think about it again. The free plan covers 10,000 events with the full server-side pixel — accuracy isn’t behind a paywall. Starter is $9/mo for 100k events plus revenue attribution, email delivery alerts, and on-demand config validation; Pro is $29.99/mo for unlimited events and daily config monitoring. Tracking never stops if you exceed a plan limit.
The distinguishing bit: the 99.4% conversion match rate against actual Shopify orders, and the fact that the team behind it also runs managed OpenAI Ads campaigns — so the tooling is built by people who have to live with the data it produces.
Reach: OpenAI Ads Pixel
What it is: A free app from Reach, a ChatGPT Ads agency. Browser + server dual-fire with a shared event_id, five Shopify events tracked, no theme edits. It’s open source, and it was built specifically after the team hit OpenAI’s buggy official snippet in client work.
Where it fits: Merchants who want a free, transparent, agency-built install and are comfortable with a lean feature set.
∞ OpenAI Ads — ChatGPT Pixel (Infinite Commerce)
What it is: Pixel install plus campaign management from inside the Shopify admin — targeting, budgets, and bidding without leaving your store, alongside CAPI event delivery and real-time ROAS reporting.
Where it fits: Teams that want the tracking and the campaign console in one surface. The tradeoff is that campaign management through an intermediary is always a subset of what Ads Manager itself exposes.
ChatGPT Ads & Pixel Tracker (wRanks)
What it is: One-click pixel install, server-side Conversions API with SHA-256 hashed customer data, campaign creation with geo-targeting and budgets, plus automatic order, checkout, and registration events via webhooks.
Where it fits: Similar territory to the above — pixel plus a campaign layer, free to start.
WeltPixel Conversion Tracking
What it is: A multi-channel tracking app where OpenAI Ads is one integration among many — GA4, Meta, TikTok, Google Ads, Reddit, and Klaviyo all share the same architecture. Browser pixel plus CAPI purchase delivery from the Shopify order webhook. On Plus, you can run multiple OpenAI pixels and assign each to specific Shopify Markets. OpenAI Ads sits on the $39/mo Plus plan.
Where it fits: Stores that want one app governing every channel’s server-side tracking and are fine paying for the breadth. If OpenAI Ads is your focus, you’re buying six integrations to use one.
Pixel OpenAI Ads & ChatGPT Ads
What it is: Pixel helper plus Conversions API for tracking ChatGPT Ads conversions and OpenAI Ads referrals server-side.
Where it fits: A straightforward alternative in the same category.
The manual route (for completeness)
You can skip apps entirely: paste OpenAI’s snippet into your theme, wire the Conversions API yourself, generate event_id from the Shopify order ID, and standardize UTMs across every ad destination URL. It works. It also means you own the buggy-snippet problem, the deduplication problem, the theme-update problem, the consent problem, and the checkout-access problem — the last of which is genuinely painful on non-Plus plans, where thank-you page and checkout script access is restricted. Server-side CAPI then isn’t a nice-to-have; it’s your only reliable measure of a purchase.
How to choose, in one line each: want OpenAI Ads done properly and nothing else → Count. Want free and open source → Reach. Want campaigns managed inside Shopify admin → Infinite or wRanks. Want every channel in one app → WeltPixel. Want to build it yourself → budget a week and read the deduplication section again.
After the Install: Three Things to Do This Week
The pixel is infrastructure, not strategy. Now use it.
- Backfill nothing — launch clean. You cannot retroactively attribute conversions from campaigns that ran without tracking. Every day your pixel is live before your first campaign is a day of clean baseline data.
- Rewrite your product catalog conversationally. ChatGPT surfaces products by context, not keyword. “Merino Crew — Charcoal” tells the model nothing. “Lightweight merino base layer for cold-weather hiking, no odor after three days” tells it everything.
- Watch the event log for a week before you scale. Refunds, subscriptions, and multi-currency orders are where value accuracy quietly breaks. Catch it at $50/day, not $5,000/day.
The Point of All This
Everyone is going to run OpenAI Ads eventually. Most of them will run it on browser pixels that miss a third of the sales, and they will conclude the channel doesn’t work, and they will be wrong for a reason they never diagnose.
The install takes fifteen minutes. The advantage lasts as long as the auction stays thin.
Install Count on Shopify — free →
Not sure your setup is right, or don’t want to run the channel yourself? The team behind Count sets up, launches, and manages OpenAI Ads campaigns on the same server-side tracking — with a free readiness audit first, so you know the opportunity before you spend a dollar. Explore managed services →
Frequently Asked Questions
Q1: Do I need to edit my theme or add code to install the OpenAI Ads pixel?
No. Count uses Shopify’s native app pixel and webhook APIs. You install the app, paste your OpenAI Ads Pixel ID and Conversions API key, and you’re done — nothing touches theme.liquid, no checkout scripts, no snippets. This also means your tracking survives theme updates and redesigns, which a pasted snippet does not.
Q2: What is the OAIQ pixel, and is it different from the OpenAI Ads pixel?
Same thing. oaiq is the JavaScript object OpenAI’s browser tag initializes, so the snippet is often called the OAIQ pixel in developer documentation and forum threads. Whether you call it the OpenAI Ads pixel, the ChatGPT Ads pixel, or the OAIQ pixel, the setup is identical: a Pixel ID plus a Conversions API key from your OpenAI Ads account.
Q3: Where do I find my OpenAI Ads Pixel ID and Conversions API key?
Both live in your OpenAI Ads account at ads.openai.com, under the Data Sources / Measurement section. Create a data source for your store, then copy the Pixel ID and generate the Conversions API key. You need the OpenAI Ads account before you can install tracking — the events have to have somewhere to go.
Q4: Will my conversions get counted twice if I use both a browser pixel and CAPI?
Not if the two events share an event_id. Count generates that ID from the Shopify order ID — unique, stable, and identical on both tracks — so OpenAI deduplicates automatically and each sale is reported exactly once. Double counting happens when merchants install a manual theme snippet alongside an app, or wire CAPI without a shared ID. If you’re seeing inflated numbers, look for a second pixel in your theme first.
Q5: Do I need Shopify Plus for server-side OpenAI Ads tracking?
No, and this is a common misconception. Checkout scripts and thank-you page access are restricted on non-Plus plans, which is exactly why browser-based approaches struggle there. Server-side delivery via Shopify’s order webhook works on every plan — the purchase is confirmed by Shopify’s servers, not by a script that needs checkout access.
Q6: How do I verify the pixel is actually working before I launch a campaign?
Place a test order and check three places: Count’s real-time event log (the purchase should appear within seconds, with the correct value, exactly once, marked server-side), your OpenAI Ads data source (events should show as receiving within about a minute), and your robots.txt (OAI-AdsBot must not be blocked, or your landing pages can be ruled ineligible regardless of tracking). Never launch on faith — you cannot retroactively attribute conversions from a campaign that ran without tracking.
Q7: Does the pixel respect customer consent and GDPR?
Count reads Shopify’s Customer Privacy API and only sends events for shoppers who have consented under your store’s settings and regional rules. Consent handling is built in rather than bolted on, which matters more on a server-side setup than a browser one — the server doesn’t automatically inherit the browser’s consent state unless the app is explicitly wired for it